Tuesday, July 21, 2015

Floral Message Board - DONE!


 This is about where I left off in my last post. I got the fabric glued on by just using some old fabric glue I haven't used for almost 7 years, still worked like a charm! Although it was pretty potent so I only could work on this during nap time, if my older boys let me, and after bedtime. Oh the mommy project schedule is NEVER predictable.

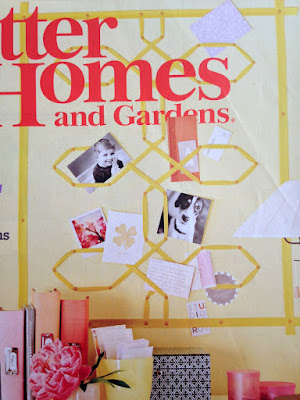
 This is the Better Homes and Garden's magazine that I've had on my shelf for years because of this picture, its great huh?! I wanted to do this trellis pattern on my own, but after I chose this fabric and my ribbon I decided I'd better do something more simple.

 So for ribbon choices I picked up this darker purple that matched the fabric perfectly, but It looked too grown up to go in my daughter's room, she is 15 months old.

 Then there was this lilac ribbon that was a little thicker that I thought helped bring the age down on this piece even though it didn't match the best it coordinated.
And then last was this thin imitation leather cording that was flat. I already had this on hand and when I remembered it I thought for sure I'd use it, but then when I pulled it out and tried to visualize it, I felt it would again be too sophisticated for her, this would be a much better choice if it was my own message board.  But really, I LOVED the idea, it was subtle yet had an unexpected gleam and is totally on trend right now. Maybe for a later project...

 So after I decided on my ribbon and the pattern I wanted, I got started.
I have been wanting these Deco Pillows for a few years from Caitlin Wilson. You guys if you don't follow her already you should, I have just LOVED every thing she does.
 After I got all of my ribbon pieces measured and cut, really I just eye-balled mostly, so its not perfect, I started placing them to form the pattern.  I used my pins from my sewing stash to just hold everything in place so then I could go back and lift sections to glue without ruining all of my hard work. 
 This is the whole thing pinned into place. I loved it, and can you believe that teeny bit of ribbon left on top of the ribbon spool in the bottom picture? PERFECT measuring people!...yeah right, total chance AND what a blessing that I didn't run out!!!!  
 So here it is all done. And as soon as we get it actually on the wall in her room I will share pictures.

We are using it already though, just propping it against the wall on her dresser next to her changing pad, and she LOVES it. I really didn't realize how much she'd enjoy pointing too, and talking about the people in the pictures. So happy I finally did it.

So what do you think? Over the top? Too busy? Or just right? My husband, I think, is being really nice when he tells me he likes it, especially because if it was going in our room I'm sure he'd change his tune.

Thursday, July 16, 2015

Starting a new project

I've been walking by this floral fabric at Joanne's for over a year and wanting to put it in my house. I live in a house full of boys, so yeah I don't have anything really girly, especially not floral, anywhere.
Well... then we were blessed with a beautiful baby girl! So slowly the girly pinks and purples and floral (maybe) are making their way into our home. Just her room really, but that's progress.
 
 So today I bought about half a yard of it, its 50% off right now, and its friends and family you guys! that means an extra 25% off your total purchase, if you shop at Joanne's you know that one doesn't come along often. Only this weekend though.
 So I have this great message board that I've been wanting to make over since before our little miss was born.

 Unfortunately I'm just now getting to it. Thanks to some left over chalk paint I had mixed from the dresser. I knew that it was supposed to apply effortlessly to pretty much any surface so I thought I'd test it out. This frame is actually a really slick plastic so I knew I couldn't just spray paint it without roughing it up first and using a special type of spray paint. So chalk paint sounded like the easiest solution.
 And it was, it went on so nice! Really just like it was wood. I did have to do about 4 coats but I hardly used any paint so it wasn't a big deal at all.
Here is the fabric laying on the board, sorry guys, I actually haven't finished yet. Thanks to lost glue and being a Mom, but I'm hoping by the end of the week it will be ready to use.

Friday, July 10, 2015

the desk is done!

And I'm so happy with how its turned out.

After I finished painting I was ready to put the wax on. I wasn't sure how to apply the wax with the bbfrosch brush so I called Whipperberry, she sells the bbfrosch chalk paint powder and teaches work shops which I still want to take. She also was SUPER sweet and totally talked me through it. And I'm so happy she did because it all worked out just like she said it would.
 
 She just told me to apply the wax with your brush in about a 12x12 area, then wipe the wax off with a lint free rag, microfiber worked for me. Then when you are done, you go back and buff it a little, or a lot for a more shinier finish. That part was my favorite. And just like they say, the Wax finish MAKES the piece come to life. The pictures don't really show that unfortunately, maybe because of the color I chose to paint it, but the look in person and the feel is much more professional.
 Then it was onto the jewelry! The hardware before would've looked great, I think, on this desk. However I wanted something more current that still was true to its style. So I went with these really pretty knobs and drawer pulls from Hobby Lobby.
Here are the old and the new. I decided to make things easier by creating a quick paper template for the drawer fronts, that would speed up the process of putting the hardware on.

Well folks, it didn't really.  Actually if the drawer pulls would've been consistently spaced it would have. But they were just a little off here, and there. Which translates into 2 days trying to get this hardware on!

 I first started with a smaller drill bit just to be safe, then I moved up, then when I realized that the hole on the pulls didn't all match up to my template, the one I measured did :) then I had to try to widen each hole by wiggling my drill side to side. Sometimes I only had to do that on one side, sometimes both, it was just super annoying.  So lesson learned, next time if I make a template measure each drawer pull to make sure it will work.

 The first one went on so fast, the others took forever... but I got it done!
 And it feels so good now to see it done!!!
 So last night my wonderful husband helped me move the desk over to its new home, for now anyway, and then I could get our dinning room back to normal too. I was ready for that.
 So I was tired of it looking so empty so I grabbed a lot of our books and some of my milk glass and now it looks like its always been there.
 I also wanted to show you how the one side has a deeper drawer, I thought that was fun, and the boys think its pretty cool too.
 Then I remembered that our yard was overflowing with cone flowers so I switched it up a little. Fresh flowers are so rare in our house, I can't believe I didn't think of doing this sooner!
So what do you think?

Sunday, July 5, 2015

4th of July weekend

I recently had my birthday and my wonderful husband gave me some chalk paint powder from BB Frosch. I've been wanting to try this product our for a long time so I wanted to get started right away, and luckily I had the perfect piece to start with.
This vintage Chippendale desk with batwing hardware and rope molding. Now these pictures actually make this piece look better than it did in person. Trust me when I say there was no way I wasn't going to paint it.  It was pretty far gone. 
 Plus it was a disgusting mess. We brought it into the cool air conditioned house before I cleaned up the cobwebs and dust, the estate sale I bought it from said it had been in their garage for awhile, but soon I found out that wasn't the only mess that needed cleaning.
 This is one of the more mild pictures, but all over the bottom of the drawers, especially the ones at the bottom of the desk, and inside of the actual bottom of the desk I found these disgusting brown little bug pod things that just were clinging in every crevice and crack. My skin was crawling, I was completely grossed out, and yes I spent HOURS cleaning and cleaning and disinfecting this desk.
This picture above shows how they were all over the bottom inside, not the best picture, but lets be honest here, you really don't want to see it anyway right? Thankfully I believe the bugs were long gone, or just died in there years ago because they were actually pretty brittle. I still don't know what it really was, but I've never seen this before in my life and I hope to never have to clean that up again.

After it was clean Nate helped me fill in the holes from the original hardware with wood filler. The new drawer pulls I want to put on here are just barely too wide for the existing holes.

 Here was the very professional method we used to mix our chalk paint. :) An older disposable Tupperware with a 1 cup measurement marked on the side.

We measured the 2 tablespoons of chalk paint powder then added the 1-1 1/2 tablespoons of water, mixed it then added 1 cup of paint. Which we pored right into the Tupperware but just went above the line to compensate for the height of the powder mixture.
 The paint I chose was a $5 sample can of Sherwin Williams - Snowbound.
 I painted the first coat and almost went through a all of the paint I had mixed.


 So I mixed some more and did the second coat which was looking much better but not quite enough.
 I was a little disappointed that 2 coats wasn't enough because one of the big claims with chalk paint is that it has better coverage and needs less coats, but without a primer and with this dark stain going to white, I shouldn't be too harsh.

 So here it is with 3 coats, so I used 6 tablespoons of my chalk paint powder. Tomorrow I'm hoping to get the wax on and then the hardware and she'll be done and ready to be used.

Thursday, June 18, 2015

Finally!

I finished making this upholstered bench and I love it! And our little girl loves it too.

There are little things that I wish I could fix, that always happens when I make something, but overall I'm so happy with it! I love it!

So a few years ago I bought this table for $2 at an estate sale around the corner from where we live. Then a year later I finally did something with it. I painted it with a glossy white spray paint.
 
 
 After choosing my fabric, making my buttons, and getting the right padding I got my wonderful husband to drill holes for the tufting.

Then I wanted to get started but this little one made it a little tough for the last year. But a few weeks ago I finally decided it was time to do it no matter what, but even with her awake it wasn't really working.


So during naptime and after Daddy came home, it was done! Just like that, I can't believe it took me that long to finish it, when really it only took a few hours and it was finished!

 And now it has a home in our little girls room in front of the window where she watches for passing squirrels, dogs, and her Daddy.